Finishing Touches for Your Dungeon
Over the last little while here on the Campaign Trail I’ve looked at the 4 Types of Dungeons, 5 Room Dungeon and Mapping and Stocking Your Dungeon Using Randomly Generated Dungeons. Dungeons come in various forms such as lost temples, haunted houses, natural caverns, or even the lower holds of a sunken ship. In this article, I’ll finish up this series by completing the dungeon with a proper introduction, read aloud text, and finished details and encounter notes.
My Dungeon So Far…
In my 4 Types of Dungeons I created an outline for a dungeon using the tables in chapter 5 of the Dungeon Master’s Guide for D&D 5th edition.
- Dungeon Location (d100): In a chasm
- Dungeon Creator (d20): Kuo-Toa
- Cults & Religious Groups (d20): Worshipers of an evil deity
- NPC Alignment (d20): Neutral
- NPC Class (d20): Ranger
- Dungeon Purpose (d20): Temple or shrine
- Dungeon History (d20): Abandoned due to plague
I then looked at using a 5 Room Dungeon to create some interesting encounters to put into the dungeon that fit this story.
- Entrance with Guardian
The dungeon is at the bottom of a chasm and is hard to find and hard to get down to.
- Puzzle or Roleplaying Challenge
The players need to defeat the guardian by solving a puzzle or destroying it using what they can learn about the temple and its goddess.
- Trick of Setback
The temple is not empty and the players will need to deal with Kuo-Toa, who capture an NPC ally. - Big Climax
The players take on the Kuo-Toa archpriest and try to save their NPC ally. - Reward Revelation
The players find the item they went to the shrine to find hidden in a pile of junk or when one of them is called to it.
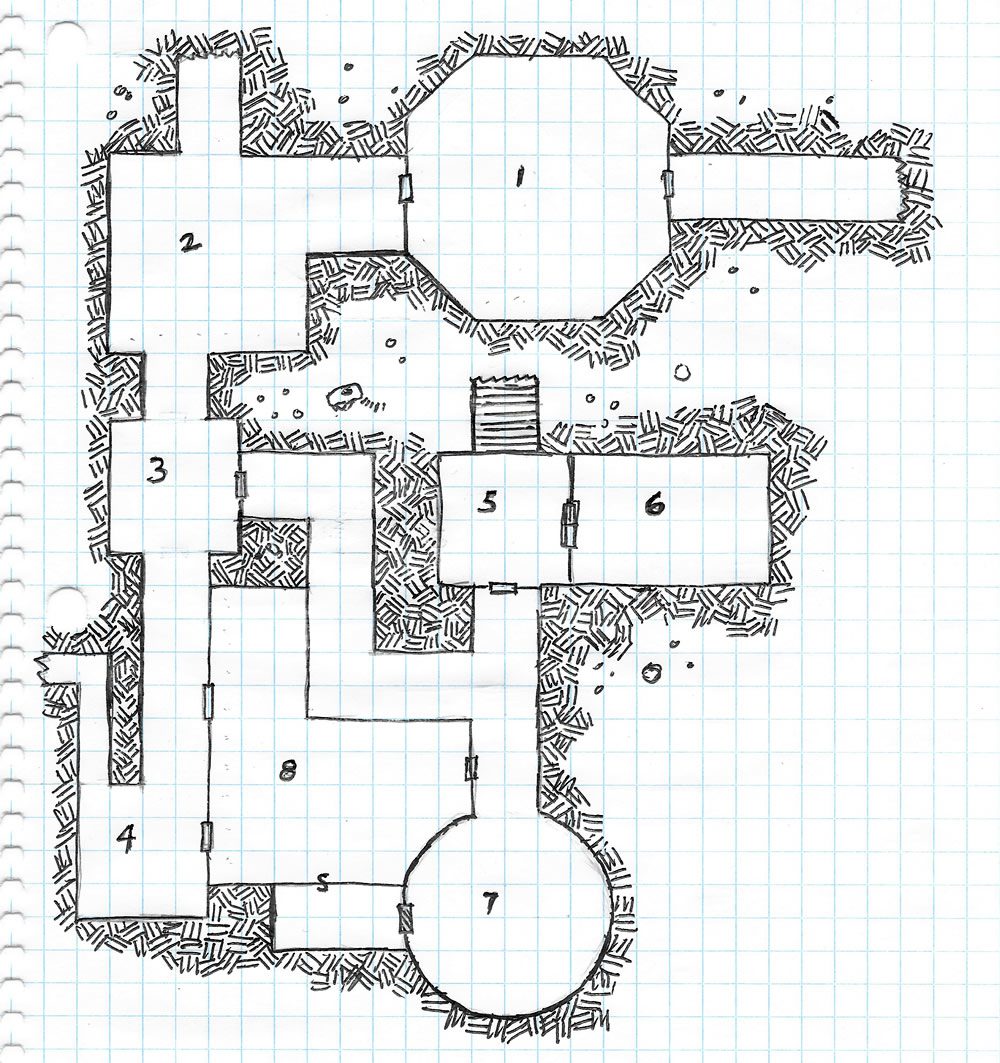
Then I rolled a random dungeon map with 8 main chambers and filled my dungeon on the Dungeon: Temple or Shrine table.
Now that I have all the pieces, it is time to put it all together.
Finishing Touches
Every GM has their own methods of prepping for a session that work for them. I usually keep my notes on rooms in a dungeon pretty light, but I thought I’d try adding some finishing touches to my rough notes I created from all the random table rolls.
Some example finishing touches are:
- Adding read aloud text which describes a room by telling players what they smell, hear, see, feel or even taste.
- Providing encounter notes for social or combat encounters
- Adding contents to your dungeon locations such as monsters, obstacles, tricks, traps and hazards.
- Providing dungeon dressing such as terrain, furnishings and all sorts of interesting items (just remember that whatever is not bolted down will likely be taken by your players)
- Well thought out treasure
- Attempting verisimilitude by only placing things in the dungeon that make sense to the setting and story (unless you and your players prefer a traditional dungeon which is just a challenging collection of cool stuff thrown together)
You don’t have to employ every type of polish for every room, but if most rooms have a little something special about them, your players will really notice.
Framing The Adventure
Let’s make some assumptions about the dungeon, campaign and the setting:
- I’ll be using the 5 room dungeon and all of the random dungeon details I rolled from the D&D 5th edition Dungeon Master’s Guide. I’ve done my best to have it all make sense, but I’m only a DM not a miracle worker.
- the player are a party of 4 at Level 3 (thanks MTi)
- they are in the middle of a campaign where they are trying to defeat a BBEG named Krune
- the world is ancient and full of the ruins of the great civilizations of the past
- the gods of old have been forgotten by most, replaced by false gods – but followers of the old gods remain, some even being true clerics and paladins
My Adventure Notes – “The Fallen Temple” (Working Title)
 Read this aloud to your players to introduce the adventure:
Long ago, there existed a beautiful city, protected by the followers of a goddess of light. One fateful day, an earthquake leveled the city and in the aftermath plague further decimated the survivors. The goddess’ priests and priestesses did what they could to save their people, but there were so many sick and injured. Another earthquake hit and the temple of light and much of the ruined city was swallowed by a chasm, falling deep, deep into the darkness.
Centuries later…
- A small group of Kuo-Toa stumble upon the temple and decide to use it to summon their own goddess created by their madness.
- Knowledge of the gods of old (Pathfinder Pantheon) has been lost and Sarenrae is far from a household name.
HOOKS & DETAILS
- The PCs find out that a lost temple is the last known location of the Dawnflower Staff, a powerful item of light that they need find to stop evil Krune
. - One of the PCs is a follower of Sarenrae and has been called to the temple in a vision/dream.
- Asking around town the PCs will find out that:
- the temple is difficult to locate and that they should hire a local ranger (a Human (m) named Ramas Astorio) to help them find it
- according to legend the temple is a the bottom of a deep, steep sided chasm and a friendly NPC will be happy to sketch a rough map
- a scholar (a Gnome (F) named Arlette Folkor) can tell them about a the goddess Sarenrae and even sketch her symbol (angelic ankh)
CLIMBING DOWN THE CHASM WALLS
This dungeon is guarded by the fact that it is hard to get down to and hard to find. Assuming they arrive during daylight.
After traveling for a few hours through light forest and meadows, you arrive at the edge of the deep chasm, which splits the forest in two. Looking over the edge you see the light swallowed in darkness hundreds of feet below.
The PCs will have to climb down a deep, steep sided chasm full of ruins using their climbing gear they hopefully purchased in town. This could be run as a skill challenge or just with some tough ability checks. Reward players for using climbing gear or magic to make it easier with advantage and lower Difficulty Checks (DCs).
Climbing down the side of the cliffs should be a multi-stage challenge (2 to 3). At each stage roll for a random encounter with a 20% chance for encountering flying creatures (or put them up against creatures hidden in cliff side burrows as an alternative). Punish the players for failing the stage climb as a group with a level of exhaustion or lost hit points
| d20 | Random Encounter |
|---|---|
| 1 | 2 harpies |
| 2 | 1 peryton |
| 3 | 2 pteranodon |
| 4 | 4 blood hawks |
| 5-20 | No encounter |
SEARCHING FOR THE TEMPLE
You finally end your climb and arrive at the bottom of the chasm. The floor of the chasm is a mixed mess of broken stone from the sides of the chasm and the ruins of buildings that crashed to the bottom ages ago. The rubble comes together to form almost maze like structures, but you are able to see multiple paths that wind over and through the ruins.
To find the temple will require some exploration and investigation to follow clues (DC15 Religion or History) to find the place. Reward any trips to the library or temple before they set out to talk with a scholar. It’s also important to make sure your PCs find an alternative way to get to the temple if they fail their checks, such as an extra encounter with a Kuo-Toa patrol or they might come up with their own fix like casting a ritual.
Once your PCs have arrived at the entrance, the ranger Ramas Astorio will say goodbye and leave to return to town. At this point, the PCs might think he is out of the adventure, but he will be captured by a Kuo-Toa patrol.
TEMPLE ENTRANCE
You find your way to a huge marble building with large portions of it that are somehow more structure than rubble after falling down the chasm. This building appears to have been a temple at one time and is adorned with large angelic ankh symbols. You see what looks like main entrance doors behind a large marble statue of a warrior.
When they finally arrive at the entrance of the temple they will find symbols that represent the goddess of light. They will also find that her temple is sealed by a large door protected by a large statue standing in front of it. There is an inscription over the top that says something about only followers of the light goddess being allowed to pass. This guardian has survived from the time when the temple was still inhabited by the followers of the goddess of light. When the PCs set off a magic sensor, the statue will slowly activate and start to fight. The slow moving guardian has no interest in battling against those who prove they are followers of the goddess of light.
The guardian can be deactivated by:
- Any radiant damage dealt to the guardian
- Any healing spell cast on the guardian
- Speaking the name of the goddess (DC15 Religion or History)
- Destroying it
RUNNING THE DUNGEON
I’d like the PCs to find out the hard way that the temple is not uninhabited and have them encounter the Kuo-Toa who are set on capturing them as slaves/sacrifices. This encounter’s main purpose it to let the players know that this place is just full of a crazy group of Kuo-Toa and to capture the Ranger NPC.
THE WELL #5
You descend down a wide crumbling staircase into square room that is 20′ by 20′ with parts of the ceiling partially collapsed and small bits of rubble strewn about the floor. As your eyes adjust to the dim light, the only feature of the room you notice is a round well at its center. Across the room is a door and there is another double door to your left. The only noise you hear is the quiet drips of water in the well.
This room has a Carrion Crawler (MM p. 37) than will slowly rise up from the well (after 1 minute) and attack the PCs. They can choose to run or fight. The Kuo-Toa have learned to avoid this room and use another entrance to the southwest (see passages into rooms #2 and #4). If PCs look into the well in their first minute of being in the room, the well will be empty and 120′ deep, but after that a look down the well will see the Carrion Crawler if it is within 60′ and the PC can see that far in the dark with darkvision or a light source. A passive Perception (Wisdom) check of DC 15 would hear noise from the well 2 rounds before the arrival of the Carrion Crawler. If the PCs travel down to the bottom of the well they should find a small chamber that contains the remains of victims and any treasure and magic items you want to have the PCs find.
THE WORKSHOP #6
You open the door into a 20′ by 30′ room that appears to have been a workshop of some kind and while dust covered, it looks like it is in its pristine, original state without rubble or any major damage your can see.
This room contains a trick. As they search the room finding various tools and materials for creating religious objects, they find a red cracked gem. When touched, the gem will reverse gravity and the PCs will fall 10 feet to the ceiling, but all the contents of the room will remain where they were.
TROPHY ROOM #3
You travel down the passage way and it opens into a 20′ by 20′ chamber that is empty. The ceiling is partially collapsed and the floor is pitted and full of holes. The room is lined with long hardwood shelves, most of which are splintered. One shelf which is still intact display skulls of various creatures and humanoids.
If the players search the shelves they will find a small pouch hidden in one of the skulls containing a small gem and 10gp.
CELLS #4
You follow the wide passageway which opens up into 20′ by 20′ chamber with 6 small open cells that appear were designed for storage or quiet prayer more than holding prisoners. Tossed around the room are a variety of ruined vestments and religious objects.
A patrol of 4 Kuo-Toa enter the room from the northwest passage. If the PCs are being quiet, they can hear the patrol approaching with a passive Perception check (DC15). Each Kuo-Toa has 1d10 silver pieces. The main goal of the Kuo-Tao’s will be to capture one of the PCs or run away if 2 of them are defeated.
THE HAG’S POOL #2
You follow the wide passageway which opens up into 30′ by 30′ chamber with a natural small pool of water in the center. The air of the chamber if clear and damp and it smells dank. All around the room are scattered teeth and fangs. Along one side of the room are a set of 3 make shift cages.
This room contains a Sea Hag that crawls out of a deep pool of water to eat sacrifices. A quick search of the cages will reveal they recently held captives. Unknown to the PCs, these prisoners were held as sacrifices to a Sea Hag. The Kuo-Toa leader is not happy with this arrangement and plans to kill the hag once he has gained enough power. An inspection of the water will reveal that it is quite cloudy and polluted. If the water is touched, this will alert the Sea Hag and create a potential combat encounter as she rises out of the pool after 1 minute to investigate. The Sea Hag will focus her attacks against the most beautiful members of the party.
If you want a tougher encounter you can add a Merrow or Sahuagin to accompany the Sea Hag.
DINING ROOM #1
You enter into a 40′ wide octagonal room full of broken tables and rubble from the partially collapsed ceiling 20′ above.
This room rolled to have a Trick where a painting is a Magic Mouth that speaks a riddle. I don’t have any idea how to put this into the dungeon and have it make sense. I think I’d rather just have this be a room to explore and find that is has already been cleared out of valuable silverware, as they find one silver spoon on a shelf. They also find a large box of white powder and a rolled up rug. Let’s go with the following for the powder:
- Powdered Water 5sp DC 10 Dragon Magazine 280 pg 51
Sparkling white powder in watertight container. Mix one ounce of powder with a single drop of water and a round later it expands into a gallon of drinkable water.
CENTRAL TEMPLE #7
You enter into a round chamber around 30′ wide full of wrecked furniture, an empty keg of ale and a buffet cabinet that has been ransacked.
So this room needs to do something, time to fight a four Kuo-Tao Whips (MM p. 200) or even better, have them hear chanting from room #8. They door to the small room is locked and the key is around the neck of the Kuo-Toa high priest.
TEMPLE OF THE HIGH PRIEST #8
You enter into a large L shaped chamber with a tall domed ceiling filled with the loud chanting of 10 Kuo-Toa. The chamber has been set-up as a temple with a large raised altar that has been crudely constructed, with a high priest concentrating on a large illusion that has formed above him. The room is in good shape and is free of rubble.
This is the grand finale where the PCs will encounter the Kuo-Toa! They’ll find a room full of worshipers (8-10 Kuo-Toa) and their high priest, Oomkaan (Kuo-Toa Archpriest MM p.200), who is trying to sacrifice the ranger to summon a twisted version of the goddess Sarenrae, created by their madness.
- Each round Oomkaan will attack the PCs and order half the remaining Kuo-Toa to attack the PCs as well. If Oomkaan is defeated or the Kuo-Toa worshippers are reduced to half their number, the “the goddess” will start to dim and disappear.
- Passing by a chanting Kuo-Toa has a 50% chance of triggering an opportunity attack.
- I’d sacrifice the ranger pretty early on in the battle, but give the players a chance to save him – even if it is slim. If your PCs and the ranger really connected on the short journey to the chasm, his death or rescue will be a nice addition to this encounter.
- If this fight drags on too long and Oomkaan is successful, “the goddess” will manifest, and be allowed to cast Spirit Guardians each round using Oomkaan’s spell save DC.
- This battle should act as a set piece with a large raised area for the archpriest that is hard to get to. The room should have a tall ceiling offering plenty of room for their “goddess” to start to appear above the archpriest. I would have some large pools of water for the archpriest to use against the players with spells like Control Water.
- A search of Oomkaan will reveal a key to a secret room located on a chain around his neck
- An successful investigation check (DC15) will reveal the secret door or the players can look for the door that the key unlocks in room #7
SECRET ROOM
You enter into a small room full of what looks like a pile of broken wood, fish bones, trinkets and trash in the center that has been fashioned into some kind of structure.
The temple room leads to another chamber that was being used by Oomkaan as a shrine. The key to this room is located on a chain around the neck of the high priest.
A quick search of the nonsensical junk and garbage filled shrine will reveal the powerful item of light as its centerpiece. If the players don’t search the shrine, then the item can call to a PC who is a cleric, paladin or the best match.
TREASURE
- Dawnflower Staff (rare)
- This is a powerful item of light that gains strength over time.
- Staff has 10 charges per day. The staff regains 1d6+4 expended charges daily at dawn.
- While holding it, you can use an action to expend one or more of its charges to cast one of the following spells from it, using your spell save DC/spellcasting ability modifier
- Cure Wounds (1 charge per spell level up to 3rd)
- Lesser Restoration (2 charges)
- The staff should gain new powers as it gets closer to being used in a final showdown with Krune
- Roll a Treasure Hoard: Challenge 0-4 on page 137 of the DMG
CONCLUSION
If the PCs were successful in finding their way through the dungeon and have obtained the Dawnflower Staff, they now have a powerful artifact that can be used against the evil Krune. If they failed, then I hope Krune is a nice evil overlord.
I hope you liked this series. This dungeon is far from perfect and it’s not ready to be published as an adventure. However, it is more than ready to run in my home game, providing way more detailed notes than I would normally need to run an adventure. I also think that this would be a pretty fun little adventure to run with a group over 1 to 2 sessions. I’m not sure how fun the climbing and searching for the temple would be, so I would see how that goes with my group and hand wave this exploration portion a bit if the players are not having a good time.
Now go build your own dungeon and let us know how it goes in the comments below.
If you liked this article and other articles here on Tribality.com, please consider supporting us on Patreon.